Search This Blog

12/27/12

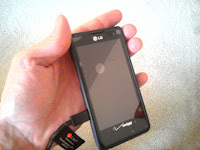
How to Save Text Pictures Sent to You on LG Lucid Phone


If you are wondering how do I save a photo that was sent to me by someone via text message on my LG Lucid phone you are asking a great question.

A friend of mine sent a text to me that contained a picture.  I wanted to save the picture and either save it on my computer's hard drive or just send it directly to Facebook.

On the LG lucid wireless phone you can take pictures that are saved to your cell phone and share them to various social networking sites, as well as email then, put them on your computer, etc.  It is somewhat easy to do when the picture is already saved to your phone, in other words, when you touch the camera icon you can readily find the picture saved in that part of your phone.  Not sure if I'm saying all that right but hopefully you get the meaning.

The more difficult challenge is when you don't have that picture in the photo file that you access via the camera icon but instead have the picture sitting on some random text message that a somebody sent you.

At first I tried opening the text message and pressing the photo so that it enlarges and then attempting to access it via the menu command (which doesn't seem to work with the picture open) or touching one of the icons on top of the photo, which basically only allow you to save to wallpaper.

So with that all said, how exactly do you save photos that are texted to you on this phone?

I'm sure there are better explanations but this is the only way I've figured out so far.  It doesn't always feel like the most efficient thing to do depending on what you are trying to accomplish (Google Plus, Facebook upload or email, etc)

Here's what works for me:

Step 1

Press the text message "Messaging" Icon so that you are looking at all the people's names who have sent you text messages

Step 2

Then find the person's name that send you the text message and press their name so that all their texts from them and you are appearing on your screen.

Step 3

After that chronological list appears of all the texts press that little square menu button in the lower left corner of your LG Lucid Smart Phone.  The menu should pop up

Step 4

When the menu appears, press "Forward"  Don't worry about selecting a specific text or anything, just press "Forward"

Step 5

The top of your screen should say "Select Message to Send"  Select the text with the photo of the message you wish to send.

Step 6

See the "To" box that appears on the top of your screen?  Yes? Now as you do this just keep trusting me here as at first you won't think you are doing this right.  Touch the "To" box so the cursor is inside it then start to type in your own email address.  As you type the letters it will look like the phone is about to dial a phone number. It won't. Enter your full email address including the "@" ".com" etc etc

Step 7

Then go ahead and hit the "Send" button.  Give it a bit and the photo will appear on your email.  From there I usually go to my PC and then extract it (ie save it, forward it, send it, whatever it is I want to do)

Conclusion

I find it hard to believe this is the only way to do this but this is what I do in the meantime until I figure something out.  Hope it works for you aOK.

Want to Move Pics from Lucid Smartphone to Your PC?  This gets a little cumbersome too.  I'm not talking about pictures that were sent to you via text messaging, I'm just talking pictures taken by your phone and are "on" your cell phone camera, so to speak.  This article will show you how to move pictures from cell phone.  Click the link above and you'll be taken there in a flash :-)
 

12/19/12

Schuylkill River Fishing and Free Animal Zoo in Royersford, PA


If you are looking for a quick free zoo trip in Montgomery County there is a cool place to go that won't cost you any money. I must be honest, technically it isn't a zoo either but there are plenty of animals held captive at their nature center to make for a fun, quick and cheap trip right in Montgomery County, PA.

Royersford is an area with things to do near Norristown and the surrounding region. They have a place were you can see wolves, foxes, all kinds of hawks, a donkey, goats, turkeys and more all for no price at all.

This is also a rather nice looking fishing spot along the Schuylkill Rivers well. The river is just behind this place and they welcome fisherman to come and fish the day away (PA fishing rules apply of course).


If you are interested in learning more about this great place for casting out your line or learning about indigenous animals of Pennsylvania, check out the post I have linked below.

Click Here for Schuylkill River Fishing and Free Animal Zoo in Royersford, PA

Please also check out some of my other posts both on this site, TurtleDogs Blog and the site I've linked to below called Things to Do In Norristown. Things to Do In Norristown is just what it sounds like. If you live in Pennsylvania this site will show you some ideas to keep you entertained and busy.

Check it out sometime.  I'd love it if you stopped by.


Thanks again for coming by. Again, please check out some more posts on this site, TurtleDogsBlog for great tips on doing just about anything whether it be taking a trip, fixing things around the house, help on your computer, tips on the internet or just general help.  I'm here to help out.


12/11/12

Add a Google Privacy Statement to WordPress WP Theme

Get That Policy Statement On Your Site
We'll I'll admit, I am not a Google Adsense terms of service (TOS) guru, nor am a a WordPress expert yet either.  I am still a work in process.  I've been using service hosted sites like Blogger, Hubpages, Squidoo, etc for years and decided to go the self-hosted route with a WordPress.Org site of my own  (ThingsToDoNearNorristown.Com).

Every so often I'll hear people warn others who have created a self-hosted (via BlueHost, DreamHost, etc) that a privacy statement should be added if you want to show Google Adsense ads on your site.  This statement generally talks about the use of cookies, double click, affiliate ads, etc and the effect they will have on your visitor's PCs. It is necessary to remain compliant with Google Adsense advertising (publisher) policy.  Check Google Adsense TOS from time to time for changes.

The way I complied with this adsense rule was to create my own Privacy Page on the Word Press theme associated with my site.  It was pretty easy to do but, dopey that I am, not that easy to figure out.  Once I learned how to add a privacy page to my WP site though, it was pretty easy.

Again, I'm not a Google TOS expert but hopefully this will get you started. If you think I'm missing anything here or if I am saying something wrong, please comment below and I'll look into your advice.

So here are the Steps I followed:

Step 1 - Find a Google Privacy Policy Plug-In For Word Press

I am quite certain there are websites out there that can create a policy statement custom for you without the need to install a plug-in, but since WP plug-ins are what WP is all about, why not try the plug in?

Download the plug in and activate it.  I used the "Google Privacy Policy" plug in but feel free to choose one that better suits you and the needs of your site.  Other Privacy statement plug ins might respond differently but I suspect they are generally the same as I describe below.

Step 2 - Settings

Click on "Settings" on your WordPress control panel

Step 3 - Google Privacy Policy

In the menu that appears you should see "Google Privacy Policy" or some derivative name of the whatever plug in you chose to install and activate.

Step 4 - Copy What They Tell You

There should be something on the screen that appears that stays Policy Statement or Google Text or something like that.  In or around that title there should be a code (or text) that you can copy and paste.  

Step 5 - Create a New Page

Now make yourself a Privacy Policy page.  On your Wordpress control panel click "Pages", then "Add New" 

Step 6 - Keep Creating The Page

For the title of the page use "Policy Statement" or "Privacy Policy" etc 

Step 7 - Paste It

In the body of the page, click on the tab that takes you to the code (where you'd enter HTML stuff etc, not where you typically do your 'normal' typing).    Paste that thing you copied in Step 4 in this area of the page.  (If you want to learn more about making a page click here and I'll also have a link at the end of this post)

Step 8 - Nothing Happend When I Pasted Privacy Statement Code!!!

The Privacy statment text might not appear while you are in the edit mode of this new page you created.  To prove that this actually works, save the new page you created.  Then open up your website in a new tab (not as the admin but as if you were a normal, random user googling your website) and refresh the screen.

Your privacy statement, based on the verbage the plug in provided, will appear.

Step 9 - I am Not an Attorney and No Trying To Dictate What Is Right For You

I'm not a contract expert, legal expert, I know nothing of your site and don't pretend to. This is important... read the text that the plug in provides and determine if this is right for your site.  For example, I also intend to add Amazon Affiliate ads to my site one day and my Google statement mentions nothing about this so I added a line stating I might make money off affliate ads, blah, blah, blah.     Your site might be different from mine and I can't tell you if the verbage is right but read it and see how it feels to you and how it compares to the current Google Adsense rules, etc.

Overall, it is pretty easy.  I hope this works out for you.  If you have anything to add, feel free to comment below...

Another Super Cool Post On TurtleDog's Blog :-)

Do you want to learn more about creating a page on Wordpress. Creating a new page is easy and this post will show you how to put add a page on WP - Click Here