Search This Blog

Showing posts with label Internet Tips. Show all posts

12/7/14

Where To Locate How Much I Make on YouTube Adsense Partnership Program

Finding your Adsense earnings through the YouTube Partnership program is pretty easy to do but like many things easy on your computer, the navigation path is not all that easy.  Regardless if you want to find out how much you are making on YouTube via the partner program, you have come to the right place. I'll even include a brief video you You Tube to show you how.

If you are not on the Google Adsense program and you are not a YouTube partner, this will not apply to you as you would not currently be able to earn on YouTube. There are other resources out there that will help you to set up an make money on Adsense.

So to in order to find the money you are making on YouTube via Adsense partner just do the following

Step 1

Log into your YouTube account

Step 2

Click on your icon photo in the top right corner of the Youtube screen

Step 3

Click on the setting button which appears as a sprocket

Step 4

New window/screen opens and click on "View Additional Features" toward the bottom left within this window.

Step 5

Click on "Analytics" in the left column of the screen

Step 6

The down under the "Performance" section you will see your YouTube earning statistics / metrics in the form of minutes watched, amount of views and importantly how much you have earned. There  is a date just above all of this that shows you the range. Mine is set for showing one month of statistics / earnings but you can change that if you want a specific date range.

I also included a video tutorial below on how to do this.

me>


9/4/13

Stop Plenty of Fish POF App New Matches Alert on Cell Phone


Introduction to Stopping Cell Phone Match Notifications of POF

OK, so you are looking for love on the Plenty of Fish website but at the same time you don't want to be overwhelmed with information, spam, unnecessary message, etc etc coming directly from Plenty of Fish ( POF ) to your cell phone

I ran into this sometime back when I loaded the Plenty of Fish ( POF ) application and I started getting every single new matches alert on my cell phone.  I do like the POF site but honestly their daily matches so to speak doesn't really do much for me let alone have it vibrate, make a sound, light up the screen, etc on my cell phone every time.

So to stop the new matches alert on you cell phone just follow these steps.  I have the LG Lucid Cell phone but this process should work on other variations of smartphones too. Give it a shot. It might not be the exact fix for your cell phone but it might be close enough to help you out.

OK....

Step One 


Menu Button On Lucid Cell (just above my index finger)
After you log into the POF app , you'll be on the home screen.  Your cell phone should have a menu button on it.  On my cell phone it is the the lower left button with the little square on it on the cell phone.

Press that button

Step Two 

A menu will pop up.  Look for SETTINGS on your cell phone screen and press it.

Step Three

Another menu will appear. Scroll down (or up) until you find NOTIFICATION SETTINGS

Step Four

Uncheck  NEW MATCHES

That's It!

Now going forward your new matches alert from POF will not vibrate, ring, light up, etc on your wireless smartphone.


 Want to Learn More POF Tips and Troubleshooting?

Hide Your Profile on Plenty of Fish 

Can I Block a User From Seeing Me on POF

3/19/13

Synchronize Lotus Notes Address Book Contacts

If you want to synchronize or "sync" your address book on lotus notes this is pretty easy to do. Just follow these steps

Step 1

Open Lotus Notes

Step 2

Look to the very top of your lotus notes window (the very top of your computer screen to the left if your lotus window takes up the whole screen). See where it says file, edit, view, create, etc? Select "Actions" which is just to the left of the word "create"

Step 3

A drop-down menu appears. Look for and click on "Synchronize Address Book"

Step 4

It'll warn you it might take a while to synch your contacts but it won't be so bad. Let it sync your contacts. I use Lotus pretty heavily and it took only a matter of minutes to complete (honestly, it may have been even less time than that, it just felt longer)

After that, it should complete aOK. Hope that helps.

1/3/13

Can't Log Off Match.Com Always Logged On Match

You like searching for love on Match.com but you find that you are logged on all the time right? For some reason you are not being logged off Match.com. That is, when others view you it says something line " online now " but you aren't even on your computer or using the related application on your cell phone. This could be embarrassing if you think you have found that someone special and they take notice that you are still searching for a date on Match 24 hours a day, 7 days a week.

There are a number of reasons why Match isn't logging you off. One reason there is no sign off is that when you are searching the site on your PC or Mac you are failing to log off before closing the website's window on your computer screen. This is probably too simple of an explanation though. I think your real problem here is that you've installed the Match.com app on your cell phone and the app you are using it a little tricky to use when it comes to logging on and logging off.

A quick way to double check this is to go to the Match app icon on your cell phone touch screen and press the icon. Once the app opens determine if it is asking you to log in or are you logged in right away? If you are logged in right away, the issue is that you are not logging out of the application before you close it. In other words, you are just pressing the back button on your phone, or closing the app without actually going to "Log Out" or "Sign Off" button

At least as of today's date I find the Match app pretty tricky to log out. Here is what I suggest:

Step 1

First, keep in mind that I am doing this on an LG Lucid cell phone but I suspect it will work the same on any phone. OK try this.....

When you are done browsing views, profiles, interests, photos, etc look to see if there is a "Menu" tab on the bottom of your screen. Don't press the menu tab, just see if one is there.


Step 2 - Not Seeing The "Menu" Tab

If you are not seeing the "Menu" tab press the back button on your cell phone. On the LG Lucid it is the bottom button with the arrow turning on itself. This button is next to the search (magnifying glass) button.

Press the back button until you see the "Menu" tab at the bottom of the screen. Again, don't press menu

Step 3 - If You See The "Menu" tab
Once you see this button go ahead and press the menu button on your cell phone. NOTE, do Not press the menu TAB on your cell phone touch screen, only press the menu button on your cell phone. On the LG Lucid this button is on the bottom far left with the square on it. It is not a button or icon on the application itself, it is
the one on the cell phone.

Step 4 - Refresh Settings Help

When you press the button the application should give you the option of "Refresh Settings Help" Press "Settings"

Step 5 - Press Sign Out

Then press "Sign Out" If you can't find "Sign Out" don't worry, you aren't the only one that struggles with this one. You'll see visibility settings, user info, text alerts, notifications and above all of that, in the upper right corner of the screen is the "Sign Out" button. Press it and you'll be signed out.


I hope that helps. Please Check Out Some Other Match Dot Com Tips Below

12/11/12

Add a Google Privacy Statement to WordPress WP Theme

Get That Policy Statement On Your Site
We'll I'll admit, I am not a Google Adsense terms of service (TOS) guru, nor am a a WordPress expert yet either.  I am still a work in process.  I've been using service hosted sites like Blogger, Hubpages, Squidoo, etc for years and decided to go the self-hosted route with a WordPress.Org site of my own  (ThingsToDoNearNorristown.Com).

Every so often I'll hear people warn others who have created a self-hosted (via BlueHost, DreamHost, etc) that a privacy statement should be added if you want to show Google Adsense ads on your site.  This statement generally talks about the use of cookies, double click, affiliate ads, etc and the effect they will have on your visitor's PCs. It is necessary to remain compliant with Google Adsense advertising (publisher) policy.  Check Google Adsense TOS from time to time for changes.

The way I complied with this adsense rule was to create my own Privacy Page on the Word Press theme associated with my site.  It was pretty easy to do but, dopey that I am, not that easy to figure out.  Once I learned how to add a privacy page to my WP site though, it was pretty easy.

Again, I'm not a Google TOS expert but hopefully this will get you started. If you think I'm missing anything here or if I am saying something wrong, please comment below and I'll look into your advice.

So here are the Steps I followed:

Step 1 - Find a Google Privacy Policy Plug-In For Word Press

I am quite certain there are websites out there that can create a policy statement custom for you without the need to install a plug-in, but since WP plug-ins are what WP is all about, why not try the plug in?

Download the plug in and activate it.  I used the "Google Privacy Policy" plug in but feel free to choose one that better suits you and the needs of your site.  Other Privacy statement plug ins might respond differently but I suspect they are generally the same as I describe below.

Step 2 - Settings

Click on "Settings" on your WordPress control panel

Step 3 - Google Privacy Policy

In the menu that appears you should see "Google Privacy Policy" or some derivative name of the whatever plug in you chose to install and activate.

Step 4 - Copy What They Tell You

There should be something on the screen that appears that stays Policy Statement or Google Text or something like that.  In or around that title there should be a code (or text) that you can copy and paste.  

Step 5 - Create a New Page

Now make yourself a Privacy Policy page.  On your Wordpress control panel click "Pages", then "Add New" 

Step 6 - Keep Creating The Page

For the title of the page use "Policy Statement" or "Privacy Policy" etc 

Step 7 - Paste It

In the body of the page, click on the tab that takes you to the code (where you'd enter HTML stuff etc, not where you typically do your 'normal' typing).    Paste that thing you copied in Step 4 in this area of the page.  (If you want to learn more about making a page click here and I'll also have a link at the end of this post)

Step 8 - Nothing Happend When I Pasted Privacy Statement Code!!!

The Privacy statment text might not appear while you are in the edit mode of this new page you created.  To prove that this actually works, save the new page you created.  Then open up your website in a new tab (not as the admin but as if you were a normal, random user googling your website) and refresh the screen.

Your privacy statement, based on the verbage the plug in provided, will appear.

Step 9 - I am Not an Attorney and No Trying To Dictate What Is Right For You

I'm not a contract expert, legal expert, I know nothing of your site and don't pretend to. This is important... read the text that the plug in provides and determine if this is right for your site.  For example, I also intend to add Amazon Affiliate ads to my site one day and my Google statement mentions nothing about this so I added a line stating I might make money off affliate ads, blah, blah, blah.     Your site might be different from mine and I can't tell you if the verbage is right but read it and see how it feels to you and how it compares to the current Google Adsense rules, etc.

Overall, it is pretty easy.  I hope this works out for you.  If you have anything to add, feel free to comment below...

Another Super Cool Post On TurtleDog's Blog :-)

Do you want to learn more about creating a page on Wordpress. Creating a new page is easy and this post will show you how to put add a page on WP - Click Here
 

11/29/12

Add Page or Pages To WordPress Theme

Creating a static page in WordPress is pretty easy to do.  Once you create a new page though, it won't just automatically add itself into your WordPress website theme. It isn't the same as when you publish a new post and it is instantly available for you readers to see on your theme. Even when you publish the page it won't appear by default on your webpage / theme.  

There are a couple real easy steps you'll need to take to get your new static page or pages onto your theme to that viewers can see it.

Here are a few easy steps after you have created your page.

Step 1

Go to your control panel on WordPress

Step 2

Go to "Appearance" and "Themes"

Step 3

Find the theme you have installed under the manage themes tab  (actually you'll probably see your theme before you see the tab).   Click on "Widgets"

Step 4

Look in the "Available Widgets" section and find the one that says "Pages"

Got it?  OK, now click on the "Pages" widget and drag it out of the available widgets section and put it where you want in your theme (ie sidebar one, sidebar two, etc)

Step 5

Now if you look at your site you'll see your page. If you aren't seeing it, just refresh the screen and it should appear.

I hope that helps!


11/4/12

PSD Locked / Mail Machine - Maybe Server Phone Issue? Fix Here

Are you having trouble clearing a PSD locked message on your mail machine?  There is a solution to removing the PSD locked by clicking this link.

That solution does not work 100% of the time though and I'll admit, I'm just talking about my limited experience with this happening with one of our machines.

Every so many days an electronic postal audit automatically occurs where your machine and the server try to connect.  If they can not connect, then the postal audit can not complete and your machine gets locked.  I suspect this is for some sort of security reason but I'm not sure.

If the above link I gave you does not work, and I highly, highly, highly, suggest you try that first, the the next solution might fix your problem.

I'll warn you, this solution only works a very small percentage of the time and you'll need to contact your mail machine equipment provider / supplier first for some information but let's try it.

Each machine is different as well so this might not work for you step by step but should be close.

This solution to PSD locked presumes or suspects that your machine is connecting to a wrong number or a number connecting to a server that has changed.  It also presumes you are using a machine connected via analog phone line versus the more popular and probably better LAN connection.

So if you are daring, have an analog phone connection and you feel the number is wrong (I'll show you how to check that) keep reading.  Don't blame me if this doesn't work though its worth a try.  All advise here I emphasis you should check with your equipment provider first. I'm not a pro at this, I'm just experienced with this specific problem. Rest is at your own risk :-)

Step 1

Again, make sure you've tried the link I gave you above. If that doesn't work.....

Contact the manufacturer or supplier of your postal equipment. Find out what the proper server number (phone number) is that connects your equipment to the US Post office site.

Step 2

While on the phone with these guys, get the code you will need to do this process.  Heck, while you have them on the phone, make sure this whole process I'm giving you now sounds right to them. Each problem is unique and this only solves certain issues.

Step 3

When you get off the phone with them, hang up, then dial the number they give you. It should respond with a fax machine sound. If you aren't hearing this, there is something wrong with the number. Stop everything and call them back and tell them what you heard.

Step 4

Go to your mail machine / meter.  Press the "Menu" button

Step 5

Go into Supervisor mode (on my equipment this is #13)

Step 6

Enter code that they gave you on the phone

Step 7

Postal access press OK

Step 8

You'll have a choice between modem or LAN option. If you are using an analog phone line select modem option  (LAN is for Internet connection)

Step 9

When in the modem settings you should see the phone number the machine is trying to connect to. Couple thoughts on this

a) Try calling it on a phone for the heck of it to see if it is responding with that "fax" sound. If so, the line is good.  If it is the same number the supplier gave you, there is nothing to change. This troubleshooting method won't work.

If it is different......

b) Go ahead and overwrite this number and make it the new number for the equipment

Enter the number and try again. You might need to unlock the equipment using the link I provided above or just start it up and go.

Again.... this won't work for everyone. It is for a very specific problem. Ultimately it is up to you to try this or not.  Just remember what you did or else you'll risk a service call which can be costly if the tech has to sit there an determine what you did the equipment.

More Great Posts On TurtleDog's Blog

Do You Ever Skype? Learn To Fix Skype Microphone Not Working on PC Here

Is Your Android Cell Phone Time Not Right After Daylight Savings? Fix Here


9/17/12

How to Change Passworld on MLB.TV

Changing or updating your password on MLB.TV won't be something you have to do everyday but every so often it helps to change your log in information.  You might update your login for security purposes or simply to make your passcode more easy to remember.

Steps to editing your Major League Baseball television login password is as follows:

Step 1

After you log in click "My MLB.TV" at the top of the page

Step 2

Click "Profile" in the options that drop down

Step 3

Under "Account Information" you'll see the word "Password"   Click "Change"

Step 4

Go ahead and change your password and save changes.

That's it!  I hoped that helped you learn How to Change Passworld on MLB.TV.  Please check out some of my other posts here on TurtleDogs Blog.

Want More Baseball info?  What positions in baseball tend to have the best slugging percentage?  Which MLB positions have the worst slugging stats.  This article ranks slugging statistics by position, check it out.

4/23/12

How to Cancel MLB.TV Subscription

Cancelling your MLB.tv subscription is not super easy to do.  In the frequently asked questions (FAQ) sections on MLB.com / MLB.tv they will tell you that you can log into any page and then find "MY MLB.com on any page at the top right corner and click on it.  At least on my account, this is not accurate.  You can look for MY MLB.com but you might not find it.  I certainly can not see that link on when I am logged in.

If you had the same problem that I had cancelling my account, do not fret.  I figured out the problem.

What you really need to find is the world "Welcome!" in the upper right corner of their web page.

When you click on "Welcome" a drop down menu will appear.

Then, in that drop down menu, click on "Audio / Video Subscriptions"

You'll be taken to the "Audio / Video Subscriptions" page.

Click the "Cancel Subscriptions" button

Now.... couple fine points you should remember and watch out for.......

You will be taken to a second page.  There is a drop down menu where you'll be asked why you want to cancel. Choose your reason (mine was all the freakin' blackouts!)

Then read the information in the check box below the 'reason' drop down menu.  Before checking the box make sure you are aware of the correct button to click.  If you want to stop your MLB.tv subscription AND you DO NOT want it to AUTOMATICALLY renew, be sure to click the "Cancel Subscription" button

If you want to automatically renew the following year (why the heck would you want to do that if you are closing your account now is a mystery to me but if you are renewing next season ) click "Cancel this season, but automatically renew next season"  Again, do NOT click this if you want to close your account.

I highly recommend going with the simple "Cancel Subscription"  You can always manually renew next year if you change your mind.  If you go with the other button and let your account auto-renew and then cancel it after 5 days it goes back into effect, you'll still be charged for the balance of the month (with monthly subscriptions) or the balance of the season (for full season subscription) depending on which plan you select.

That's it!  Hope That Taught You How to Cancel MLB.TV Subscription.

Thanks for reading

More Posts By TurtleDog

What Are Minor League Players Paid Anyway? Learn Here what AAA baseball players make in monthly salary.  It isn't as much as you think. 

Certain positions tend to hit better than others in baseball.  Some do much better in slugging percentage. This post will tell you on average which positions slug better than others in MLB.

2/28/12

Change Online Dating Email on Match.Com

Match.Com is a super popular online dating site.  A lot of people look for love on Match on a long time and along the way they need to make changes to their personal account information.

All notifications from Match.com are available to come to your via email.  If someone is interested contacting you it will happen through email. If someone wants to wink at you on Match you have the option of getting winks email to you. If you want Match to recommend partners for you, you can get the recommendations through email.

Sounds like email is pretty important right? It is!  The last thing you want to do is forget to change your email on Match.com if you need to.

Changing your online dating e mail takes more steps that you think. Fortunately, this article will have you updating a new mail address in no time.

Step 1 - Log In

Log onto your Match.com account as you normally would.

Step 2 - Find "Account"

Look to the upper right corner of your screen and find the  word "Account"  Click on "Account"

Step 3 - Account Drop Down Choices

In the drop down box that appears click on "Settings"


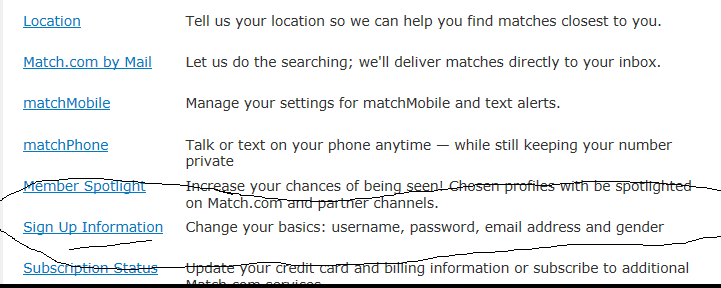
Step 4 - Sign Up Information

Then looks for "Sign Up Information" 

"Sign Up Information" is toward the bottom of the screen (at least as of the date of this post).  Click it.


Step 5 - Re-Enter Your Password

Enter your password in the space provided. I know, you are already logged in but Match will ask you for your password again as an extra measure of security and privacy.

Step 6 - Sign Up Information Screen

In the sign up information screen, click the button that reads "Change Sign Up Info"

Step 7 - Change Your Email Address

A block will appear with all of your personal information. Look for the box that contains your email address. Go ahead and change your email address and click the "Continue" button

You're Done!

If everything has been done correctly the screen will read "You've updated your sign up information correctly"  Your email address is now changed on Match.com

I hope that helped.  Now comes the waiting game as you hope that someone special, that someone who pines away for your love, will send you a romantic (or at least really funny) email.

Good luck in your online dating search for love.

Please Check Out These Other Posts on TurtleDogs Blog

Ever meet someone online that just freaks you out?  That internet stalker? That dubious person you have a bad feeling about?  Does this person not want to leave you alone? Do they keep contacting you on Match but you want to block them?  I've been asked a number of times if you can block a certain individual from contacting you on Match.com.  I wrote an article telling you what you can do

How Prevent Emails From Someone on Match .... Can You Stop Them From Checking Your Profile Too? Find Out

Ever Get Those Daily Matches from Match.com and you are asked to select if you like the person, don't like the person or if they are a "Maybe"?  You might be wondering if that person is notified?  Are they? Well... maybe, maybe not. Click link below to find out

If I Select "Maybe" When I See My Daily Matches..... Does The Person See This?

2/26/12

Stop Facebook User From Sending App Invites For Applications

Invites to use applications on Facebook book can be annoying when over done. I don't use many apps and there are people I barely know (we all have FB friends like this) who send a trillion different app invites to me and they just pile up until I hit the "ignore" button.

One thing I have noticed is that the invites for these apps tend to come from the same people. How about you? Do you find that 80% of the application invites are created by only about 10% of the people sending them to you?  This is a good thing because it makes blocking application invites a lot easier.  You only have to stop a few people from sending these and it is easy to you.

This post will take you step by step through the process of preventing a Facebook user or users from sending you app invites.

Step 1 - Log into your Facebook account as you do every time you go on FB.

Stop Facebook User From Finding Seeing Your Profile Timeline

The vast social network out there is a great way to get your message out an update friends and family on your whereabouts and what you are up to.

There are some drawbacks of course and the biggest is when the wrong people are looking at your private information.

Maybe you have a boss on Facebook that you want to hide your personal profile / timeline from.  Maybe there are people out there you simply do not want to friend or have you ask to be their friend.

Regardless of your reasons, you are reading this post because you want to hide your Facebook profile / timeline from someone. You simply do not want to interact with this person and you want to prevent them from seeing you on Facebook.

Blocking friends and people in general from your Facebook profile / timeline is easy to do.

This article will take you through the easy step by step process of updating your Facebook settings to hide your profile.

I will warn you that as of the date of this article (2012), once you block someone you can not see their information either.  Neither you or the friend or user you have blocked will be able to see each others timelines / profiles and you won't be able to find each other on Facebook.

Step 1- Log into your Facebook account as you normally do everytime you visit FB.

2/13/12

Tools Missing on Blogger Tool Bar ?

If you begin to write a post on your Blogger blog and find that there are tools missing from the tool bar don't fret. You might be missing the text color, highlight colors, bullets, alignment etc. 

If you notice that a ton of those buttons are missing and only your bold, italic, abc with line throught it, etc you are simply on the wrong tab.

On Blogger, you can compose an article on the "compose" tab, which shows you the text as you see it here right now, or you can use the "Edit HTML" tab, which will show you everything in HTML code.  If you are missing much of the tools it is likely because you are in the "Edit HTML" mode instead of "Compose"

To fix this, simply look to the top right corner and click the "Compose" tab and all of the missing buttons will appear again.

Hope that helps!

More Great Posts On TurtleDogs Blog

Powering UP and Powering OFF a Laptop PC With the Lid Closed Shut

Problem With Something Called Cross Scripting on Blogger? Troubleshoot it Here

2/2/12

Change Staples Advantage Approver

Depending on a  user’s profile settings they might need a certain supervisor / approver to approve their purchases all the time or approve when they try to buy something over their spending limits.
 
If the wrong person is approving your purchases you can ask your site administrator or whoever has rights to change your profile to modify who your supervisor is.  You might be able to do this yourself if your profile is set up to allow you to make changes to your own account.
 
If you are able to make these changes, or if you want to find out, try these steps:
 
Step 1
 
Log into your Stapleslink / Staples Advantage account
 
Step 2

See  “My Account” somewhere close to the top of the screen? Just put your cursor on top of it. Don’t click, just hover it over.

Step 3

Select (click) “Manage Users” in the drop down window that appears.

Step 4

Look for the  “Search for a User Profile” area and search for the person who wants their approver changed.

I think the best way is search for this person by their last name.
Step 5

In the field to the right you’ll see “Edit Profiles”   Highlight the person’s name who has the profile you want to modify.

Step 6

Click “Go” button

Step 7

Scroll down to the section called “Approval Requirements and Spending Limits”

Look for the section that says “Approver”
 

Step 8
 
Click the drop down arrow next to approver and find the right ‘approver’ and select them
If you are not seeing the name of the person you want to make the approver:
 
-They might not have an account set up.  Ask your site administrator if they can be set up
 
-The approver you are searching for might not be set up as a supervisor. Talk to your site administrator to set that user up as supervisor.

Please Read Some of My Other TurtleDog Posts

How to Remove a User From Staples Advantage

How to Allow a User to Delete Other Users From Staples Advantage

Why Do StaplesLink / Staples Advantage Have Different Prices From Staples.Com ?

Allow User to Delete on Staples Advantage Stapleslink

If you are given the rights to do so (typically your site admin that works within your company or your supervisor), you can modify a person’s profile on Staples Advantage (Stapleslink) so that they are given the rights to delete other user’s accounts.  

This is pretty easy to do if you are permitted to do so.  Here’s how:

Step 1

Go ahead and log into the Staples Advantage / StaplesLink website

Step 2


Find the “My Account” link around the top of your computer screen and position your cursor on it.


Step 3


You’ll see a bunch of options in a drop down menu, choose “Manage Users”


Step 4


Under the section “Search for a User Profile” find the name of the user you want to give deletion rights to.


I think it is easiest to search for their last name. In the choose “Last Name” in the “By Name or ID” section then go ahead and type their name in the field underneath.


Step 6


Click “Go” Button


Step 7


In the field to the right you’ll see “Edit Profiles”   Make sure the name of the person is in that field and then highlight it.  If their name is not appearing, they might not be set up on the account or you may have spelled the name wrong.


If you are not sure of the spelling, you can just type part of their name. You might get multiple results. If you do get more than one name, go ahead and highlight that name.


Step 8


Scroll down to the “User Administrator Roles” Section.  If you are not seeing this section, you might not have the rights to make these changes. If you are, keep reading.


Step 9


Here you have three choices.  Choose the one you want by clicking radio button


-Cannot create, modify or delete any users (select this and this person will not be able to make changes to others on this site)


-Can create, modify or delete only his or her own associates but cannot modify any of his or her own information (select this option and the person can delete that is assigned “associate’ under their account but they cannot modify their own info.  It is kind of like saying, yes the boss can change their employees but the boss can’t change his or her own info.)


-Can create, modify and delete all users. (Make changes to anyone)


Step 10


Choose either of the last two and will be able to delete profiles from Staples Advantage.  


Then click the “Save” button

Now that this user can delete another user, you'll need to explain to them just how to do it. Click Here to tell them how


That’s it!

Is Buying on Staples On Line Really "Easy"?

How Do Shredding Services Work?

Delete User on Staples Advantage Stapleslink

Deleting users on Staples Advantage (formerly Stapleslink) website is pretty easy. In order to remove a user from your Staples Advantage account you need to have your profile set up so that you have the rights to delete another user’s account.  These rights are typically managed by whoever your company has assigned within your organization as site administrator.


Here are the steps to eliminating a person’s profile so they can no longer make purchases on this website under your account.


Step 1


Log into your Staples (Advantage) account as you normally would.


Step 2


Look for “My Account” somewhere at or near the top of your computer screen and hover the cursor over it.


Step 3


In the drop down choices that appear, select “Manage Users”


Step 4


Under the section “Search for a User Profile” search for the person you want to remove. I typically do this by searching for their last name (to do this be sure “Last Name” is selected in the “By Name or ID” field and then type all or part of the person’s last name in the field below)


Click “Go”


Step 5


Then look over to the right at the “Edit User Profile Field”  


-If you don’t see any name, you either typed their name wrong or they are not on the account.


-If you see multiple names be sure to highlight (click) on the name you want to delete


-If you only see one name, and it is the right one, it should already be highlighted (if not, highlight it by clicking on it)


Step  6


Hit the delete button and that person will be permanently removed from the account.

That's it!

More Great Posts on TurtleDog's Blog

Is Staples Advantage / StaplesLink A Good Service?

Iron Mountain Shredding - What Is That All About?

1/30/12

Cross Scripting on Blogspot Blogger - How to Stop IE Message

OK, I am no expert on cross scripting. I do know that one day I decided to experiment with using other templates on one of my Blogger Blogs  and every time I selected a different template design I would get a message stating that Internet Explorer (IE) is preventing cross scripting.

From rudimentary research it sounds like cross scripting can really make your computer vulnerable to PC security risks.  I'd delve more into this but honestly I'd just be plagiarizing Wikipedia so check it out for yourself if you want details.

The more I kept trying to view the template, the more I'd get the IE message telling me the cross scripting is blocked. I wanted to work around this message since it was slowing down my writing process. That said, I certainly did not want to put my PC at risk. I just wanted to continue to work on my blog.

Basically, I closed out IE, rebooted and tried again using Mozilla as my browser.   After that, I did not get any more script messages. Hopefully this isn't some half assed work around that will wind up crucifying me later (which is a habit of mine by the way, self-cruxifiction, that is). 

Soon I reverted back to IE and was not seeing any more warnings using IE either.

Did I do the right thing?  Let me know if you have any thoughts. It did allow me to get back onto my template project.  I have heard that IE can be a little over-cautious when it comes to warnings. This is probably not a bad thing but likely creates a lot of false-alarms. Would love to hear from you in comments below if you have any knowledge on this.

If you are wondering, the templates I reviewed were simply on Blogger's standard, stock, template choices. These were not on some odd ball so-called "Google Approved" third party template website.

I hope that lends some insight.

If Your Computer Isn't Getting Any Bizarre Scripting Messages, Check Out Some of My Other Posts

The Guy Who Utterly Butchered The AFL Championship Game National Anthem

Turn PC Laptop On Off With Screen Closed

1/18/12

Update Ebay Expired Credit Card Seller Information

“In order to receive uninterrupted service, please update this information.”  I saw this message when I logged into Ebay. I knew it was because I needed to update my expired credit card.

Ebay also gave me a procedure to do this and the instructions stank.
This is more or less how it read: 

1. Go to Home page.
2. Go to My eBay at the top of the page, and sign in
3. Click the "Seller Account" link (below the “My Account in the left navigation menu).
4. Follow the instructions to update your method of payment
This only kind of  works.  I found the instructions kind of vague, inaccurate and a little confusing. The good news is that I think I found an easier way.
If you are having the same problem and can not find where to update your expired credit card information the process I used below worked fine.  Keep in mind, this is for updating your Ebay seller account so you can pay seller fees.  If you are trying to update your PayPal / Ebay buyers account so you can pay for stuff, click here.
1. When you log in go to MY EBAY
2. Then just hover your cursor over the ACCOUNT tab. The account tab is located between your ‘messages’ tab and your ‘applications’ tab. Don’t click on the Tab, just hover over it.
3. In the drop down menu that appears select ‘Personal Information’
4. Page down a bit and look for a section titled ‘Financial Information”
5. Did you find this section? If yes, you’ll see ”Credit Card” in that section. Click “Edit”
6. Go ahead and enter your credit card information. Remember to enter the security code (ie card ID number) on back.
7. Click the “Continue” button, etc
You should be able to take it from there. The rest is easy enough.

Are you having problems communicating with your Ebay customers? Here are some tips that will help keep buyers happy.

Update Edit Ebay / Pay Pal Credit Card Info

Eventually you might need to edit your credit card information on PayPal due to expiration or change of card. You might also need to edit your primary or secondary funding source.


Changing your PayPal credit card via the Ebay website (which eventually redirects to PayPal) can be done by following the instructions below.  Keep in mind that this method is not for changing how you pay your Ebay seller account if you sell stuff on Ebay. That is detailed in another article.  This article is to help you edit your PayPal / Ebay buyer account credit card and/or primary payment information.

Try this:


1. When you log in go to MY EBAY
2. Then click on the ACCOUNT tab. The account tab is located between your ‘messages’ tab and your ‘applications’ tab.
3. Now look to the left side of the and click on “seller account” which is in the menu to the very left of the screen
4. Page down a bit and look for a section titled “Your PayPal Account Information. Don’t click on the ‘Payment Method for Seller Fees” section above this, look for “Your PayPal Account Information”
5. Did you find this section? If yes, Click “Update Profile Summary” which is located below “Automatic payment method”
7. Click Update Profile
8. Log into Pay Pal
9. Now you’ll be in the My Profile screen (if you aren’t go to my account tab – profile )
10. Click My Money on the left side of the screen
11. All your bank account and credit card information should appear. Go ahead and edit your credit card by clicking “update” then “edit”
11. Choose your preferred funding source radio button
12. Click Edit Available Funding Sources
13. Go ahead and edit and then save the information
I hope that helps.  Be sure to check out some of my other TurtleDog Posts

How to Communicate Better On Ebay